
How to Check Your Flange Sizing with a Wearable Pump
When you’re using a traditional breast pump with a clear flange, it’s easy to see what’s happening. You can visually check your nipple placement, movement, and whether your areola is being pulled in. That’s part of why I recommend starting with a traditional flange setup when you’re new to pumping—and always keeping one around for troubleshooting.
But with wearable pumps, we’re working blind. Some have partial visibility, but most don’t give you a clear view of what’s happening inside the flange tunnel. So how do you know if your flange size is right? Let’s break it down.
Step 1: Start by Measuring Your Nipple
Flange sizing begins before you even put the pump on. Use a nipple ruler to measure your base nipple size (before pumping). Silicone rulers are handy but can sometimes make nipples appear larger than they are, so measure carefully.
👉 You can download a free L-shaped nipple ruler here.
In most cases, the right flange size is about 1–2 mm larger than your measured nipple. This range accounts for nipple elasticity and tissue type.
Plastic traditional flanges often require more exact sizing since they naturally pull away from the body.
Wearables, on the other hand, press more evenly into the breast tissue (thanks to bra compression and pump weight). That means you almost always need that little bit of extra space to allow proper nipple movement.
For step-by-step help, check out my guide on how to measure your nipples.
Step 2: Understand What “Correct Fit” Really Means
You may have seen the new advice circulating about measuring only the nipple tip and trialing flange sizes around that number. At Genuine Lactation, we are fully aware of this recommendation—but we are also seeing the fallout in real time.
Here’s what’s happening when parents follow that method:
Nipples plugging the flange like a cork → This blocks nipple movement, stalls milk flow, and puts extra strain on pump motors. (We’re seeing wearable motors die prematurely because of this.)
Severe nipple damage → Without elongation and stretch, the nipple is assaulted instead of supported.
Sizing failures across the board → Parents are left with painful pumping and poor emptying.
It’s critical to understand that this sizing approach came from a pilot study that has no applicability to wearable pumps as it only evaluated triangular shaped traditional flanges and followed parents for a week. Wearables apply compression and weight differently than traditional pumps. Applying those results directly can cause serious harm.
At Genuine Lactation, we are experts in wearable pumps. We will not assist in flange practices that risk your nipple health just because of a limited study.
Instead, here are the guiding principles of correct flange fit:
Pumping should feel comfortable.
Only the nipple—not the areola—should enter the flange tunnel.
Pumping should take no more than 25–30 minutes on average.
The nipple should show visible movement (elongation and stretch), which is what triggers oxytocin and prolactin—the hormones that drive letdown and milk production.
Need help with supportive bras? Watch this video on bra fit for pumping.
Step 3: Use Photos to Check Fit
Since wearables block your view, the best way to check sizing is with photos.
Pump with your wearable as usual.
When you finish, remove it and immediately take a front and side photo of your nipple. (Smartphones make this easy—don’t stress about doing it live.)
Look at where the markings are on your nipple.
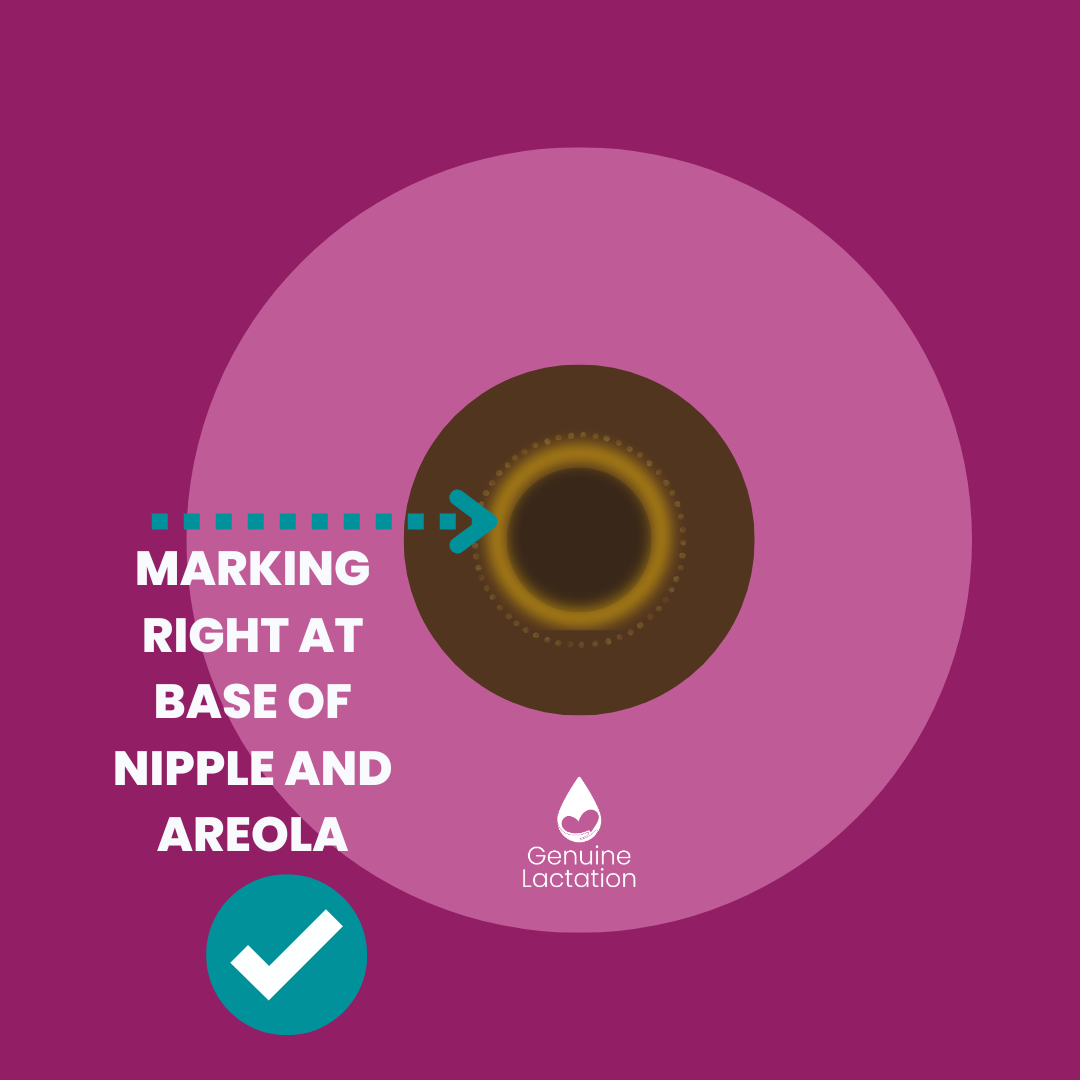
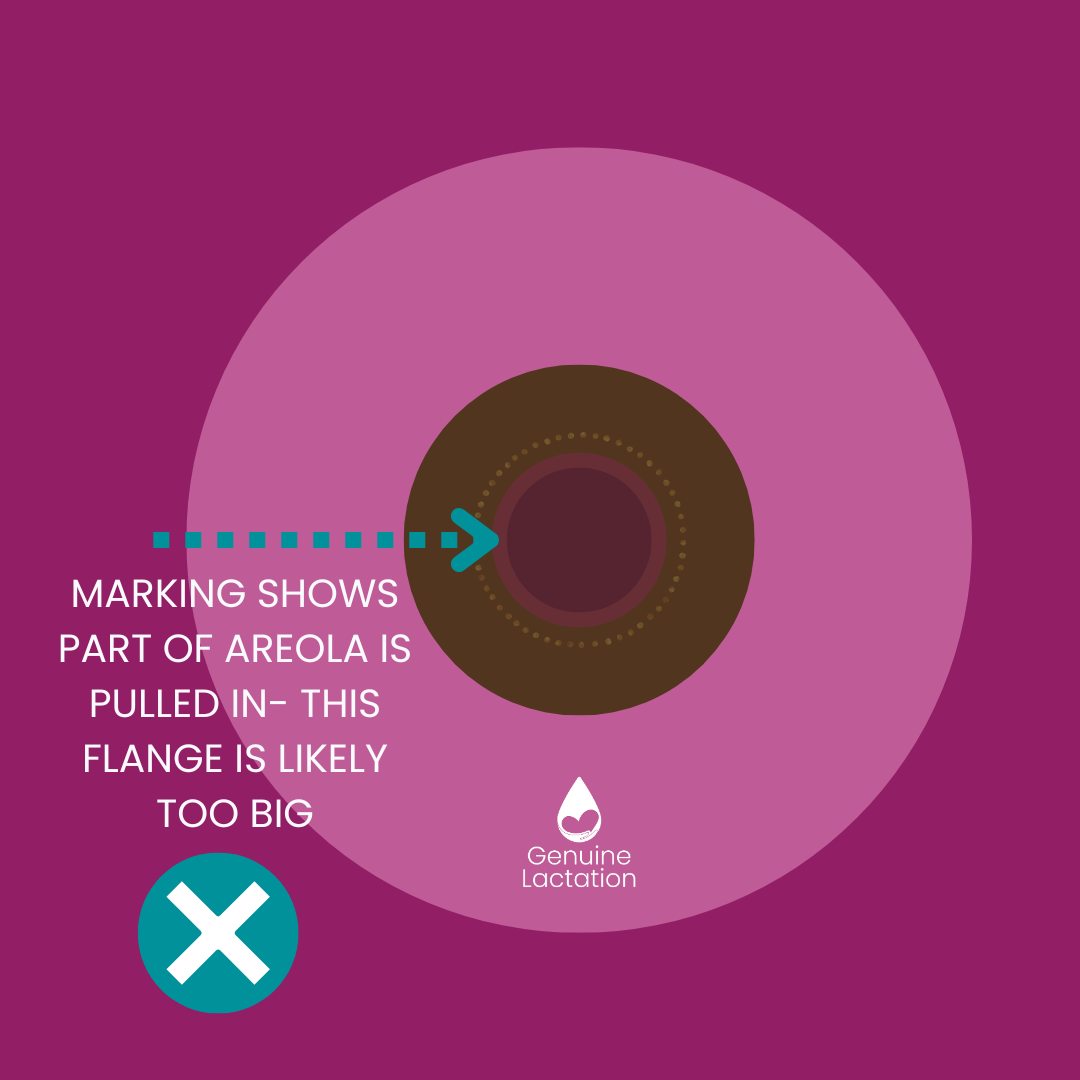
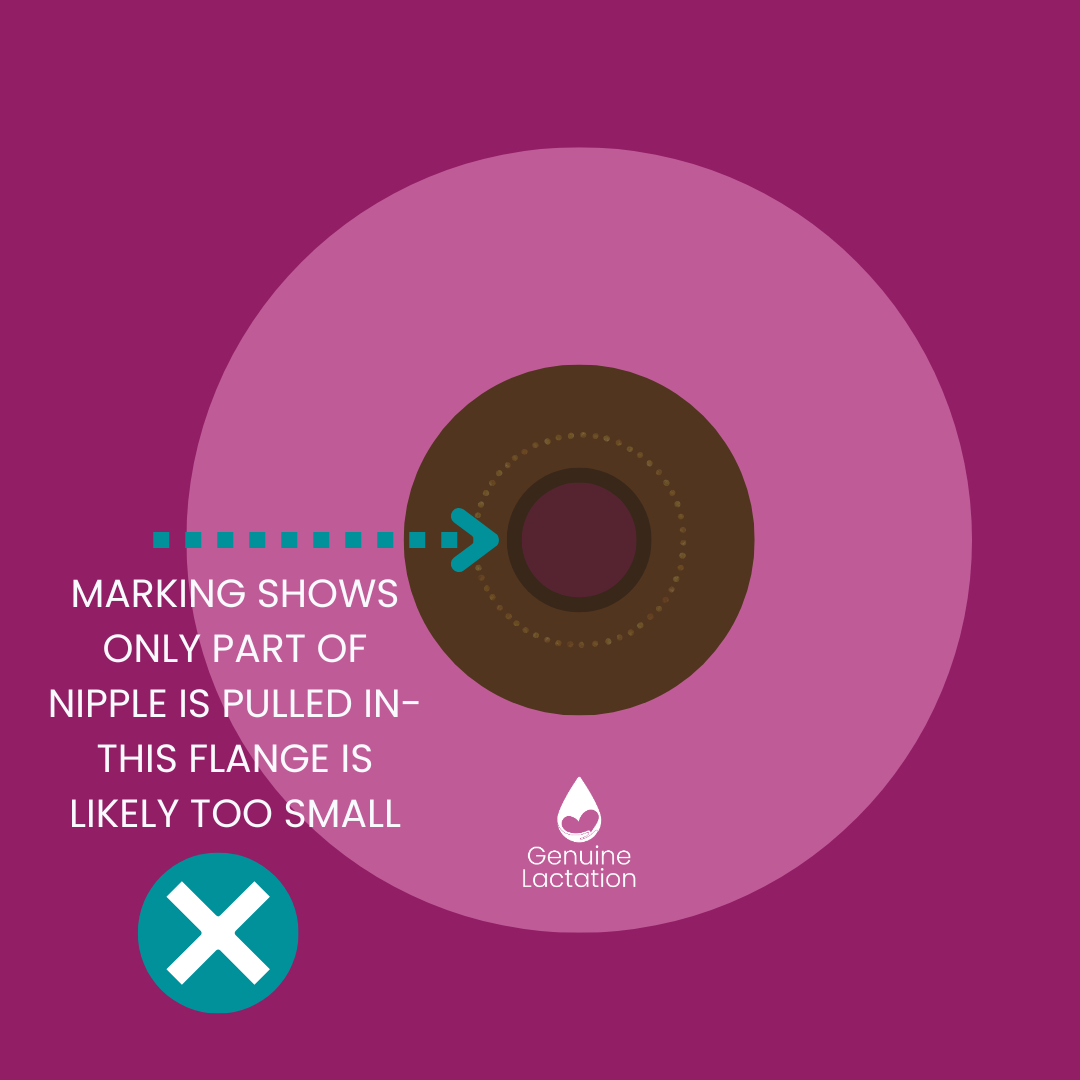
Here’s what to look for:
Marks at the base of the nipple only → Correct size.
Marks higher up on the nipple / uneven color → Flange may be too small, alignment may be off, or your bra fit may be affecting suction.
Marks on the areola → Flange is too big or the pump is pulling too far back.
💡 Tip: Marks from good flange sizing fade quickly (within 1–2 minutes). If they linger, the sizing is likely off.
Step 4: Compare with a Traditional Flange
If you’re unsure, you can test your sizing with a standard flange. To mimic wearable pump conditions:
Hold even pressure all the way around the flange while pumping.
This recreates the compression of a bra holding a wearable in place.
This method helps confirm whether what you’re seeing matches your wearable experience.
When to Call in a Professional
If your measurements are more than 2 mm off from what seems to be working, or if pumping feels uncomfortable, it’s time to get professional help.
At Genuine Lactation, we specialize in wearable pumps and flange sizing. We’ll work with you to troubleshoot, adjust, and make sure your pump works with your body—not against it.
👉 Want to dive deeper into wearable pumping? Explore my On-Demand library designed to help you make wearables work for you.
Final Thoughts
Checking flange sizing with a wearable isn’t as straightforward as with a traditional pump, but it’s absolutely doable.
Start by measuring.
Confirm fit with post-pumping photos.
Cross-check with a traditional flange if needed.
Reach out for professional support if things aren’t lining up.
No matter which pump you use, the right flange fit should leave you comfortable, efficient, and confident in your pumping routine.
✨ Need help now? Book a consult with Genuine Lactation and let’s make your pumping journey smoother.